
Handpose is a technology used to detect and track hand positions and gestures. It has a wide variety of applications, from VR and AR experiences to human-computer interaction. Using the ml5.js library we can load a pre-trained Handpose model into our p5.js script to detect and track our hand using the webcam.
NOTE: Remember to allow the use of webcam in your browser when prompted.
Part 1: Load the HandPose model
Let's begin by setting up our p5.js sketch which loads the ml5.js library. We will also access the video from our webcams, so make sure to allow your browser to access your webcam.
We can load the pre-trained Handpose model from ml5 and define a callback function to let us know when the model has successfully loaded. You may notice that the model may take some time to load. Compared to the other pre-trained models we have used so far in these workshops, Handpose is on the larger side and requires a little more memory.
Part 2: Detecting
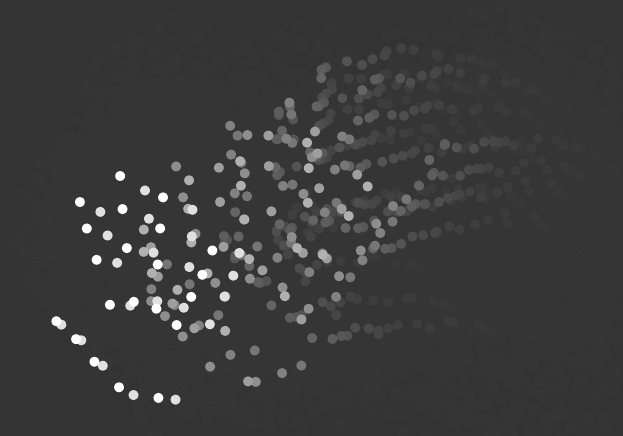
Now that the model is loaded we will implement a function to draw the keypoints of our hand as predicted by the model. To do this we will create a nested for-loop which first traverses the predictions given by the model at each video frame, then each keypoint detected within each prediction.
If we look at the values returned by Handpose we see they are in the form of a list of attributes. For now we are interested in the attribute called landmarks. There are 21 landmarks for the entire hand and each landmark contains three values, the x, y and z position of the keypoint. We will use the x and y position of each keypoint to draw a small circle on our canvas using the p5.js ellipse function.
Part 3: Hot hands / cold hands
We can make this a little more interesting to look at by hiding our video and focusing on the points detected. We will implement two different visualisations, one to represent cold hands and one to represent warm hands. First we create some color gradients using the color and lerpColor functions.
We can also do a small hack in our draw function by adding an alpha value to our background which will allow us to create a ghostly trail following the hand motion. As the draw function is called in a loop while the script is running, it will overwrite the previous image on our canvas. By setting a low alpha value we are making the background slightly transparent which gives the impression of a trail.
Part 4: Image classification
Now let's take this a step further by adding some image classification to the mix. Here we will use a sketch we created in our previous workshop to train and save an image classifier to detect when we are showing a fist and when we are showing our palms.
This classifier has two classes, A and B. By clicking the add images buttons we are collecting images from our video feed to use in training the image classifier. We can collect around 30 images or so for class A holding our palms up and the same for class B showing our closed fist. It is useful to move your hand around a bit to make sure the model has seen some variation of both classes.
We can then press the train button to train the classifier and check the results by clicking the start guessing button. When we are happy with the accuracy we can save the model files for later.
The save button will trigger the classifier to create two files, model.json and model_weights.bin. The first describes the structure of the model and the second contains the weights resulting from our training. Make sure you allow your browser to download multiple files from the p5 editor when prompted!
Part 5: Putting it all together
We can now add functionality to load a trained image classifier into our Handpose script. Firstly we will load the ml5 feature extractor and define the structure of our 2-class classifier. We will add a load button and a predict button as well. The load function opens a file browser and lets us select the two files we created.
By implementing a similar logic to what we used in our image classification workshop we will define two boolean values, hot and cold, and set them both to false at the start of our script. When our classifier detects one of the classes the corresponding value should turn true.
Once our image classifier has loaded our files we can press the start guessing button. Using our classifier we will now shift between our hot and cold hand tracking animation without having to train the model again.
Going further:
Explore other hand and body pose projects!
- Use PoseNet instead of HandPose to detect full body motion as in the DanceOn project.
- Take this work a step further by implementing additional sign-language detection.
Resources:
This workshop is based on this tutorial from the ml5.js resources and the ml5.js handpose tutorial